 Owner
Owner Owner
OwnerThe HLW8032 is a high-precision energy metering IC that is primarily used in single-phase applications. It measures line voltage and current and active power. It allows calculating apparent power and power factors.
HLW8032 can use two measuring methods: isolated and not isolated.
Note 1: Both measuring methods are sensitive for correct AC input connection. Please swap L and N wires if you get strange results.
Note 2: ⚠️⚠️⚠️ High voltage hazard!
Not isolated measuring
This method does use any transformers, and the MCU side is separated from the AC side using optocouplers.
Voltage coefficient: 1.88
Current coefficient: 1
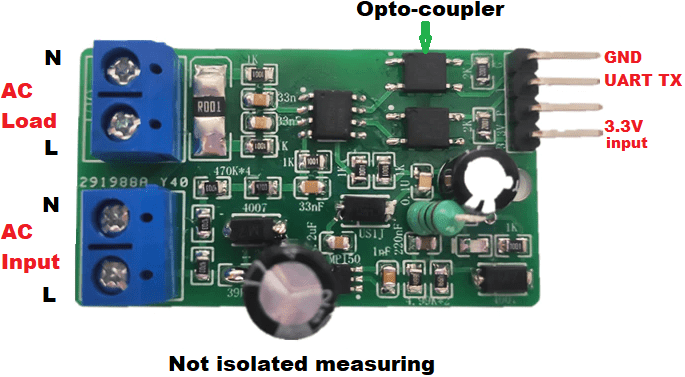
Advantages of this HLW8032 board:
- Easy-to-use.
- All coefficients are known.
- The board has a reference schematic.
- You can find a 3rd party software for this board to read values. The access password is i59p.
- A library for Arduino.
Disadvantages:
- MCU not isolated from high-voltage (common ground).
Isolated measuring
Using this measuring method, the MCU side is separated from the AC side using voltage and current transformers.
I’ve tested this board too. It looks less precise than the non-isolated version. Moreover, you should measure and set coefficients for current and voltage. To achieve that, you should measure AC voltage using a multimeter, then connect a load with a known value (e.g., a 100W lamp), calculate current. Then get results, compare with your initial values and calculate a coefficient.
Voltage coefficient: 33.8
Current coefficient: 1
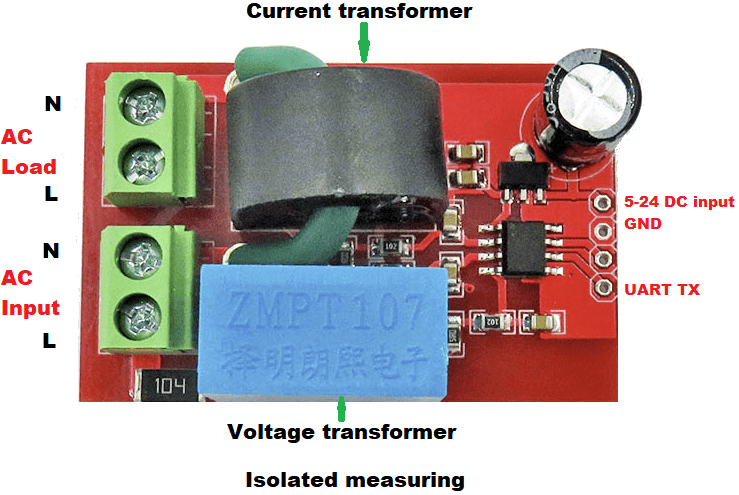
Advantages (in comparison with the board above):
- Full isolation using voltage and current transformers.
Disadvantages:
- Less accurate.
- No power supply.
- It is necessary to measure and calculate coefficients (check a resistor’s nominal before on your board).
- Actually, this board does not work with 5V because input voltage comes to 78L05 (nearby to a large capacitor), and it requires minimum 7V. If you have the 5V power supply, you can short-circuit 1 and 3 pin on 78L05.
The firmware settings
You should connect the “TX” pin of boards to the “P02” pin on CC2530 or CC2531.
- Select the HLW8032 board type (isolated or not).
- Specify coefficients for your board (see above).
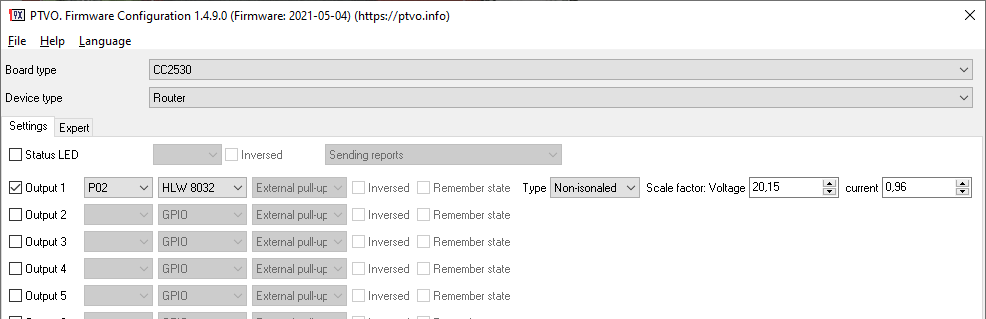
⚠️ The firmware reports the following values to the coordinator:
- Voltage (V, volts).
- Current (A, ampere).
- Power factor (0 – 1).
- Instant power (W, Watt).
- Summary energy (kWh, kilowatts per hour).
Nirm
The last time I used HLW8032+ CC2530, if I powered it off, and I powered on it again, the energy data sent will back and start from zero value again.
Hope in future design, when it is powered on again after off, it will continue and accumulate calculations for energy data by remembering the value the last it is powered off(with save output state to NVRAM?).
And in addition, it also adds a control/button for resetting energy data to zero
Thank you.
Owner
NVRAM has a limit of write operations. After this, a whole NVRAM may stop working, and you will need to replace CC2530.
frederic
From HLW8032 spec:
”
The UART interface operates at fixed frequency of 4800 bps and its interval for transmitting data is 50mS, which is suitable for design of low velocity.
”
Guess: This means that HLW8032 sends a new packet of data / measurements every 50ms
Will your firmware send a new packet of data / measurements every 50ms ?
(i.e. 20 MQTT messages per seconds)
Thanks.
Owner
No, the firmware will send data to a coordinator and MQTT using the reporting interval from the Expert tab.
Nirm
After using firmware-2022-07-29 .zip, there is slope increment in energy entity after giving load. But It is still odd, the increment will be happened after so long minutes after giving load. It must have risen once the load is applied. Please see picture: https://postimg.cc/D4W3ZMz9
Nirm
I have read from HLW8032 datasheet rev 1.3 page 15 as follows:
PFcnt = k*65536 + n ; n = is the register value of PF register. If PF register overflows, Bit 7 of the Data Update Register will be inverted and PF register cleared to zero. (my note: It makes an increment in k value )
Current energy (kW.h) = PFcnt * Power Parameter Reg* Vk*Ik/ 1000000000 * 3600;
Are you sure that the code in the firmware also declares and includes variable PFcnt for calculating energy data?
Owner
I’ve double-checked the formula. It is correct. Please note, the formula returns kWh. Z2M rounds kWh to one digit after a decimal point (e.g., 0.050 kWh -> 0.0 kWh). So, the device needs some time to count 0.1 kWh.
Nirm
I just did quick test HLW8032 Non-Isolated with CC2530 + CC2592, using Output1 pin P02 (fw: 2022-06-06). I applied a custom converter generated by the app. It looks fine for measurement of Voltage, current, power, and power factor on z2m dashboard, such as 3.2A, 230.5V, 694.3W, 0.9 cosf . However, for energy measurement, It starts displaying 0 Wh, increase to 0.1 Wh, 0.2 Wh, 0.3 Wh, and always back to 0 Wh respectively for around time interval(30 minutes). When the zigbee device is restarted, it is always back to 0 Wh. I would like to know, whether it is actually designed like that ,or is something wrong in my setting.
Another, in my opinion, It should have displayed as kWh unit, not Wh.
Owner
The firmware just reads values. I think you can read a datasheet for hlw8032 to get more info.
zheng
Why is it that Zigbee2MQTT cannot obtain 8032 data and has verified through serial port that 8023 is working properly. Is there any other way to debug 2530?
Owner
Sorry, but there is not way to debug cc2530.